Can you paint car interior? Yes! With the right preparation, materials, and technique, you can refresh your car’s interior by painting various surfaces like plastic, vinyl, and even fabric. This guide provides a beginner-friendly, step-by-step process to achieve a professional-looking finish safely and effectively.
Ever looked at your car’s interior and felt a little… tired? Maybe the dashboard plastic is faded, the door panels have scuffs, or the seats are just not the color you want anymore. It’s easy to feel like replacing these parts is the only option, and that can get expensive quickly! But what if I told you there’s a way to give your car’s inside a whole new look without breaking the bank? You absolutely can paint your car’s interior, and it’s more accessible than you might think.
Many car owners wonder if painting the inside is a good idea. Will it look cheap? Will it peel off? Is it safe? I’m here to tell you that with the right approach, you can achieve fantastic, lasting results. This guide will walk you through everything you need to know, from choosing the right paint to making sure it stays looking great. We’ll cover which materials you can paint, what tools you’ll need, and how to tackle the job step-by-step. Get ready to transform your car’s cabin from drab to fab!
Why Paint Your Car Interior?
There are several compelling reasons why you might consider giving your car’s interior a fresh coat of paint. It’s not just about aesthetics; it can also be a practical and cost-effective solution.
Revitalize Worn or Faded Surfaces
Over time, exposure to sunlight, heat, and general wear and tear can leave plastic trim pieces, dashboards, and door panels looking dull, faded, or scratched. Painting can cover these imperfections and restore a clean, uniform look to your interior. Think of it as a facelift for your car’s cabin!
Change the Interior Color Scheme
Maybe you bought a car with an interior color you don’t love, or perhaps you’re just craving a change. Painting allows you to completely customize the look of your car’s interior. You can go for a classic look, a sporty vibe, or something truly unique. This is a fantastic way to personalize your vehicle and make it feel more “you.”
Cost-Effective Alternative to Replacement
Replacing interior panels, dashboards, or even seats can be incredibly expensive. In many cases, parts are discontinued or only available from dealerships at a premium price. Painting offers a budget-friendly alternative that can achieve a similar result, making it a smart choice for savvy car owners who want to save money while still upgrading their vehicle’s appearance.
Repair Minor Damage
Small cracks, scuffs, and minor abrasions on plastic or vinyl surfaces can be unsightly. While paint won’t fix structural damage, it can effectively cover up and blend minor surface imperfections, making them much less noticeable and improving the overall appearance of your interior.
What Can You Paint in a Car Interior?
Not all surfaces in your car are created equal when it comes to painting. Knowing what is paintable will save you time and a lot of frustration. The key is to use specialized paints designed for automotive interiors.
Plastic Trim and Dashboards
Most hard plastics found in car interiors are excellent candidates for painting. This includes:
Dashboard panels
Center consoles
Door panels (the hard plastic sections)
Pillar covers
Glove box doors
Speaker grilles
These surfaces are typically made of ABS (Acrylonitrile Butadiene Styrene) or similar plastics, which, with the correct preparation and primer, can hold paint very well.
Vinyl Surfaces
Vinyl is another common material in car interiors. While some vinyl is treated to resist paint, many types can be successfully painted. This might include:
Some dashboard coverings
Door panel inserts
Center console armrests
Older style vinyl seats (though painting fabric seats is a different process)
It’s crucial to use a flexible vinyl paint or adhesion promoter to prevent cracking.
Leather (with Caveats)
Leather seats, steering wheels, and shifter boots can also be painted. However, this requires specific leather paints and primers designed for flexibility and durability. The process is more involved, and the results can vary. For beginners, sticking to plastic and vinyl is often easier.
Carpet and Fabric (with Specialized Paints)
While you can paint car carpets and fabric upholstery, it’s a different ballgame. You’ll need specialized fabric paints or dyes. These sprays are designed to penetrate the fibers. It’s important to note that painting fabric can change its texture and feel, and overuse can make it stiff. For a beginner looking to paint their interior, focusing on hard surfaces is generally recommended first.
What NOT to Paint
Airbag Covers: Never, ever paint over airbag covers or any part of the airbag system. This can interfere with its deployment in an accident, creating a serious safety hazard.
Seatbelts: Seatbelts need to function reliably. Painting them can compromise their strength and functionality, which is a major safety risk.
Rubber Seals and Weatherstripping: These are usually made of EPDM rubber and are designed to be flexible and withstand extreme temperatures and UV exposure. Most paints will crack, peel, or become brittle on rubber.
Glass: Obviously, you don’t paint the windows.
Metal Parts with High Friction: Unless you’re experienced, avoid painting metal parts that see constant friction, as the paint is likely to wear off quickly.
Choosing the Right Paint and Materials
The success of your interior painting project hinges on using the correct products. Standard spray paint from a hardware store simply won’t cut it. You need products formulated for automotive interiors and the specific materials you’re painting.
Types of Paints
Automotive Interior Aerosol Paints: These are the most common and beginner-friendly option. Brands like Dupli-Color, SEM, and Krylon offer interior-specific lines designed to adhere to plastic and vinyl. They come in a wide range of OEM colors and custom shades.
SEM Paints: SEM Products are highly regarded in the automotive refinishing industry. They offer a broad spectrum of specialized aerosol and liquid spray paints designed for various automotive surfaces, including plastics, vinyl, and leather. They are known for their durability and excellent adhesion. You can find SEM products at auto body supply stores or specialized online retailers.
Color-Matched Aerosols: Some companies can mix automotive paint to match your car’s original interior color code, though interior color matching can be tricky due to fading and variations. It’s often easier to choose a general interior black, gray, or beige, or to use a paint designed to cover and be a uniform color.
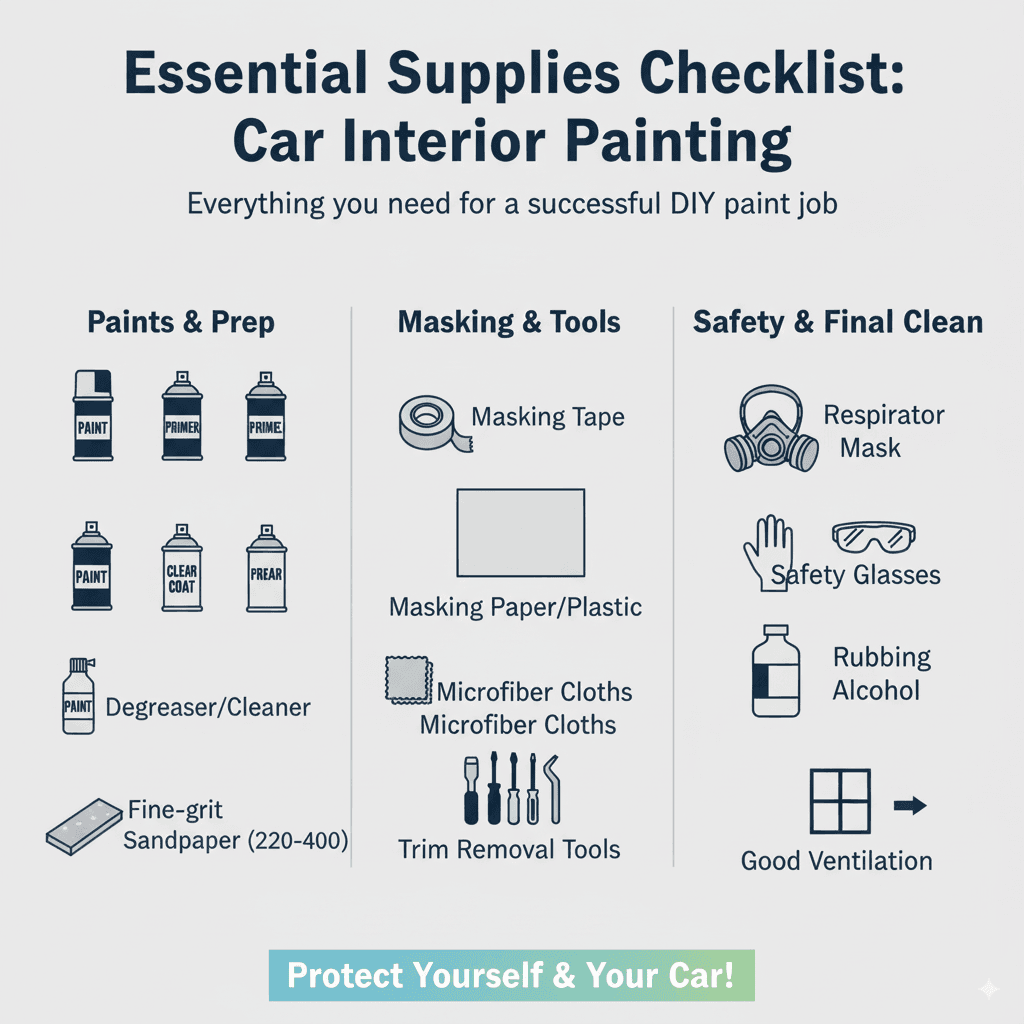
Essential Supplies Checklist
Here’s a list of what you’ll need for a successful interior paint job:
Paint: Your chosen automotive interior spray paint (plastic/vinyl specific).
Primer: A flexible plastic adhesion promoter primer is crucial for most plastics. For very slick surfaces, a specific bonding primer might be needed.
Clear Coat (Optional but Recommended): A flexible clear coat can add durability and a factory-like sheen, protecting your paint job.
Degreaser/Cleaner: An automotive interior cleaner or a simple solution of mild soap and water. Denatured alcohol or a specialized plastic prep solution works best for final cleaning.
Masking Tape: High-quality automotive masking tape (e.g., 3M automotive masking tape) in various widths to protect areas you don’t want to paint.
Masking Paper or Plastic Sheeting: To cover larger areas like seats, carpets, and windows.
Applicator Pads/Microfiber Cloths: For cleaning and applying certain prep solutions.
Sandpaper: Fine-grit sandpaper (220-400 grit) for light scuff-sanding.
Rubbing Alcohol or Isopropyl Alcohol: For a final clean to remove any oils or residues.
Gloves: Nitrile gloves to protect your hands from chemicals and paint.
Safety Glasses: To protect your eyes from overspray and debris.
Respirator Mask: Essential for protecting your lungs from paint fumes. Do not skip this step! You can buy a suitable respirator from hardware stores or automotive paint suppliers.
Ventilation: Ensure good ventilation in your workspace.
Screwdrivers/Trim Removal Tools: To carefully remove interior panels for easier painting.
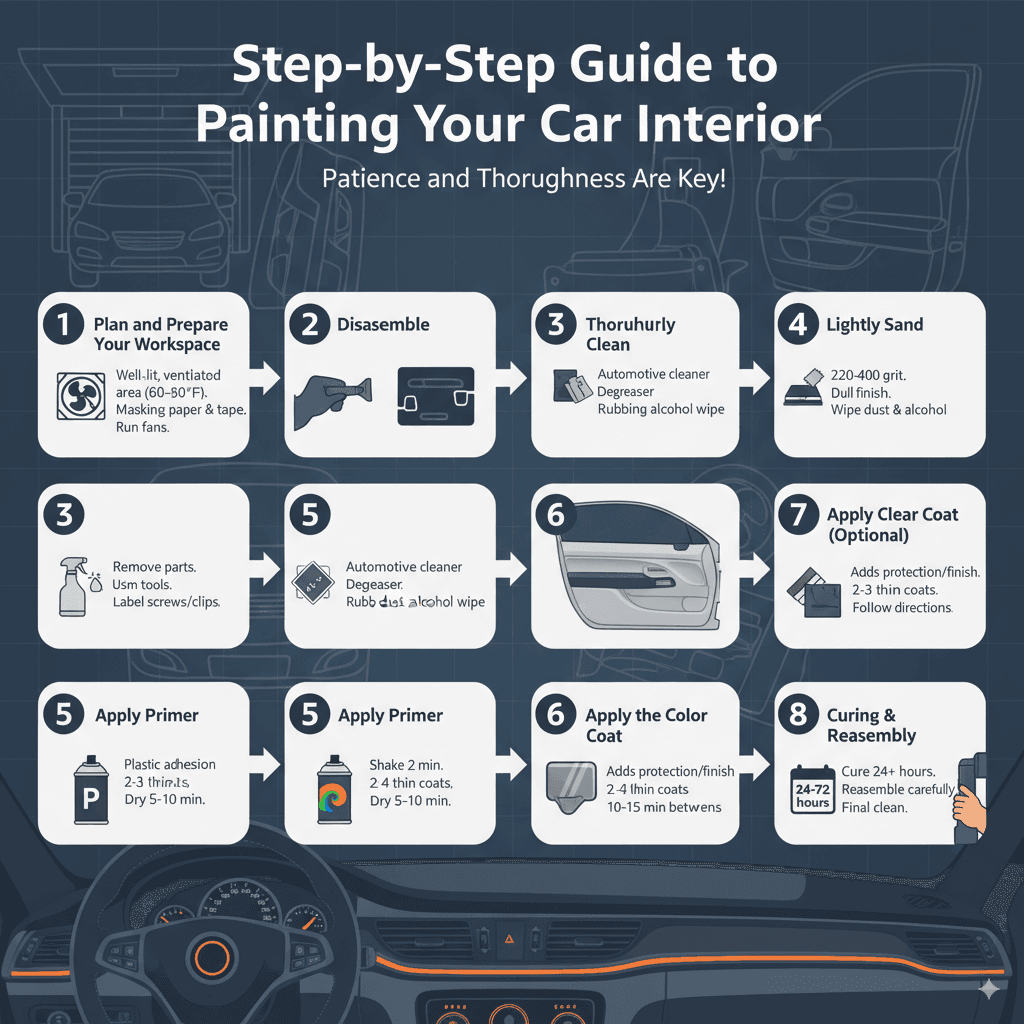
Step-by-Step Guide to Painting Your Car Interior
Let’s get down to business! Following these steps will help you achieve a professional-looking finish on your car’s interior. Patience and thoroughness are key at every stage.
Step 1: Plan and Prepare Your Workspace
Choose a Suitable Location: Find a well-lit, well-ventilated area, ideally a garage or a shaded outdoor space. Avoid direct sunlight, which can cause paint to dry too quickly and improperly. Ensure the temperature is within the paint manufacturer’s recommended range (usually between 60-80°F or 15-27°C).
Protect Your Car: If painting inside the car, cover any surfaces you don’t want painted with masking paper and tape. This includes seats, carpets, the steering wheel (if not painting it), and the windshield. Use masking tape to create clean lines around the areas you will paint. For removable parts, it’s best to take them out and paint them separately.
Ensure Ventilation: Open garage doors or windows. If painting inside the car, run fans to circulate air.
Step 2: Disassemble (If Possible and Necessary)
For the best results, it’s highly recommended to remove the interior parts you plan to paint. This allows for more even coverage and easier access to all edges and corners.
Refer to your car’s manual or an online tutorial specific to your car model for instructions on how to safely remove panels, trim pieces, or consoles.
Use trim removal tools to avoid scratching or damaging the plastic clips.
Keep track of all screws and clips, perhaps by labeling bags or using a magnetic tray.
Step 3: Thoroughly Clean the Surfaces
This is arguably the most critical step. Any dirt, grease, wax, or residue will prevent the paint and primer from adhering properly, leading to peeling or a poor finish.
Initial Cleaning: Use an automotive interior cleaner to remove general dirt and grime. A damp microfiber cloth can also work.
Degreasing: For plastic and vinyl, use a dedicated plastic cleaner or degreaser. For a more budget-friendly option, a mixture of warm water and a mild detergent can work, but follow up with a more potent cleaner.
Final Wipe-Down: After degreasing, wipe the surfaces down with rubbing alcohol (isopropyl alcohol works well). This removes any remaining oils or contaminants and ensures a pristine surface for priming. Use a clean, lint-free cloth.
Step 4: Lightly Sand the Surfaces (Scuff Sanding)
This step helps create a rougher surface for the primer and paint to adhere to.
Use fine-grit sandpaper (220-400 grit).
Gently roughen the surface of the plastic or vinyl. You’re not trying to remove material, just create a dull finish.
Wipe away all sanding dust with a damp cloth, then follow up with a dry cloth and a final wipe with rubbing alcohol.
Step 5: Apply Primer (Adhesion Promoter)
A good primer is essential, especially on plastics that might be slick or have a coating.
Choose the Right Primer: Use a flexible plastic adhesion promoter designed for automotive interiors. SEM Sandable Primer or Dupli-Color Adhesion Promoter are good choices.
Application: Shake the can well. Apply the primer in thin, even coats. Hold the can about 8-10 inches away from the surface and use a steady back-and-forth motion.
Multiple Coats: Apply 2-3 light coats, allowing each coat to dry according to the manufacturer’s instructions (usually 5-10 minutes between coats).
Drying Time: Let the primer dry completely. Some primers may require a longer drying time or even light wet-sanding (check product instructions).
Step 6: Apply the Color Coat
Once the primer is dry and ready, it’s time for the color.
Shake the Can: Shake the color paint can thoroughly for at least two minutes.
Test Spray: Spray a small test patch on paper or an inconspicuous area to check the spray pattern and color.
Apply in Thin Coats: Hold the can 8-10 inches away and apply the paint in thin, even, overlapping passes. Avoid applying heavy coats, as this can lead to runs and uneven coverage. Work in a consistent pattern (e.g., horizontal strokes, then vertical for the next coat).
Multiple Coats: Apply 2-4 thin coats, allowing about 10-15 minutes (or as directed) between coats for the paint to flash off (become slightly tacky but not wet).
Inspect for Coverage: As you apply each coat, check for dull spots or areas that need more coverage. Aim for a uniform color.
Step 7: Apply Clear Coat (Optional but Recommended)
A flexible clear coat adds a layer of protection and can give a professional, satin or gloss finish.
Allow Color to Dry: Ensure the color coat has flashed off properly. The paint should feel dry to the touch but not fully cured.
Apply Clear Coat: Shake the clear coat can well and apply in thin, even coats, similar to how you applied the color.
Multiple Coats: Apply 2-3 coats for good protection.
Drying: Allow the clear coat to dry for the time recommended by the manufacturer.
Step 8: Curing and Reassembly
Drying vs. Curing: Paint needs to “flash off” and dry between coats, but it also needs time to “cure.” Curing is a chemical process that hardens the paint fully. This can take anywhere from 24 hours to several days or even a week, depending on the paint and environmental conditions. Avoid touching or stressing the painted surfaces during this period.
Reassembly: Once the paint is fully cured and hardened, carefully reassemble any parts you removed. If you painted parts while they were installed, carefully remove all masking tape and paper.
Final Clean: Give the interior a final wipe-down.
Troubleshooting Common Painting Issues
Even with the best preparation, you might run into a few hiccups. Here’s how to deal with them.
Paint Not Adhering / Peeling
Cause: Insufficient cleaning and degreasing, lack of primer, or using the wrong type of primer.
Solution: If the paint is peeling immediately, you’ll likely need to strip it off the affected area using a plastic-safe stripper or sanding, re-clean, re-prime, and repaint. For future projects, always use a dedicated plastic adhesion promoter and ensure surfaces are meticulously clean and scuffed.
Runs and Sags
Cause: Applying paint too thickly, holding the can too close, or moving too slowly.
Solution: For fresh runs, try to gently blend the edge while the paint is still wet. If it has started to dry, you may need to let it dry completely, then lightly sand down the run and reapply thin coats until smooth.
Orange Peel Texture
Cause: Paint drying too quickly, too much air pressure (if using a spray gun), or holding the can too far away.
Solution: This is a common issue with spray cans. Light sanding with fine-grit sandpaper (800-1500 grit) followed by rubbing compound and polishing can often smooth it out. If sanding, you might need to reapply a clear coat.
Uneven Color Coverage (Dull Spots)
Cause: Not applying enough thin coats, or not allowing adequate drying time between coats.
Solution: Apply another light, even coat of paint. Ensure you are overlapping your passes and maintaining a consistent distance.
Durability Tips for Your Painted Interior
Painting your car’s interior is a great way to rejuvenate it, and with a few extra steps, you can ensure it lasts.
Allow for Full Curing
As mentioned, curing is vital. Resist the urge to put everything back in its place or use the surfaces heavily too soon. The longer you can let the paint cure, the harder and more durable it will become. Many paint manufacturers suggest waiting at least 48-72 hours before significant use of the painted parts, and sometimes up to a week for full hardness.
Use a Flexible Clear Coat
Using a clear coat specifically designed to be flexible is key for car interiors. This provides an extra protective layer against scuffs, UV rays, and general wear, while preventing the paint underneath from cracking due to the flexing of plastic panels.
Clean Gently
When cleaning your car’s interior after painting, use mild cleaners and soft cloths. Avoid harsh chemicals, abrasive sponges, or stiff brushes on the painted surfaces. Gentle wiping with a damp microfiber cloth is usually sufficient for routine cleaning.
Avoid Harsh Solvents
Be mindful of cleaning products you use in your car. Many household cleaners contain solvents that can break down or damage paint finishes. Stick to automotive interior cleaners, mild soap solutions, or water.
Consider UV Protection
While many automotive interior paints have UV inhibitors, prolonged exposure to intense sunlight can still cause fading over time. Using a sunshade when parked can help protect all interior surfaces, painted or not.
Touch-Up is Possible
* Don’t panic if you get a small scratch or scuff later on. Many automotive interior paints are available for touch-ups. You can often reapply a thin coat to the affected area after a thorough cleaning.
How to Paint Leather and Fabric
While beginner-friendly projects focus on plastic and vinyl, you might be curious about other materials.
Hi, I’m Melvin, an automobile engineer with extensive experience in automobile equipment. I currently work for a local automobile firm, where I specialize in the car parts industry. I’ve had the opportunity to collaborate with seasoned inspectors, gaining invaluable hands-on experience that goes beyond just theory.
My passion for automotive care started at a young age, which led me to create CarSpareCare. Through CarSpareCare, I share the knowledge and skills I’ve acquired over the years to help others navigate the world of car maintenance and repairs.
My goal is to provide practical tutorials, essential safety advice, and the latest industry insights so that anyone—whether a beginner or an expert—can confidently tackle their automotive projects.