
Back halfing a unibody car involves cutting off the rear section and replacing it with a new one, often to repair rust or damage. Our proven method breaks this complex task into manageable steps, making it achievable with the right preparation and tools. You’ll learn how to prepare your vehicle, make precise cuts, and securely join the new section.
Understanding Back Halfing a Unibody Car: A Beginner’s Guide
As car owners, we all face the common frustration of rust or damage that can weaken the rear end of our vehicles. When this happens to a unibody car, it can seem like a huge, daunting problem. But don’t worry! Back halfing – which is essentially replacing the rear portion of your car’s structure – is a repair that can be tackled with the right guidance. This isn’t as scary as it sounds when you break it down. We’re here to walk you through a proven method, step by step, making this complex repair accessible. Ready to learn how to bring your car back to its best? Let’s get started!
Why Back Half a Unibody Car?
Several reasons might lead you to consider back halfing your unibody car. Understanding these will help you determine if this repair is the right solution for you.
Severe Rust Damage: Unibody cars, especially those in humid or salty environments, are prone to rust. The rear frame rails, floor pans, and quarter panels can become so corroded that they compromise the vehicle’s structural integrity. Back halfing effectively removes the rusted sections and replaces them with solid metal.
Accident Repair: If the rear of your car has been significantly damaged in a collision, back halfing might be the most efficient way to restore its original shape and strength. This is particularly true if the frame rails or major structural components are bent or broken.
Restoration Projects: For classic cars or vehicles undergoing extensive restoration, replacing the rear section can be part of a larger effort to bring the car back to its former glory with fresh, solid metal.
Customization: Sometimes, custom builds involve modifying the rear structure of a unibody car to accommodate wider tires, a different suspension setup, or unique body styling.
Is Back Halfing Right for Your Car?
Before diving in, it’s crucial to assess the situation. Back halfing is a significant undertaking that requires specific tools, a dedicated workspace, and a good understanding of metal fabrication.
Extent of Damage: Is the damage confined to the rear section, or has it spread? Extensive rust or damage that affects the B-pillars or front sections might make back halfing impractical or not cost-effective.
Vehicle Value: Consider the overall value of your car. For older or less valuable vehicles, the cost and effort of back halfing might outweigh the potential benefit. Auctions for used car parts can be a good place to find replacement sections.
Your Skill Level & Tools: Do you have access to welding equipment (MIG is highly recommended for unibody), cutting tools (angle grinder, plasma cutter), measuring tools, and safety gear? Are you comfortable and experienced with cutting and welding metal? If not, this might be a project to consider professional help for, at least partially.
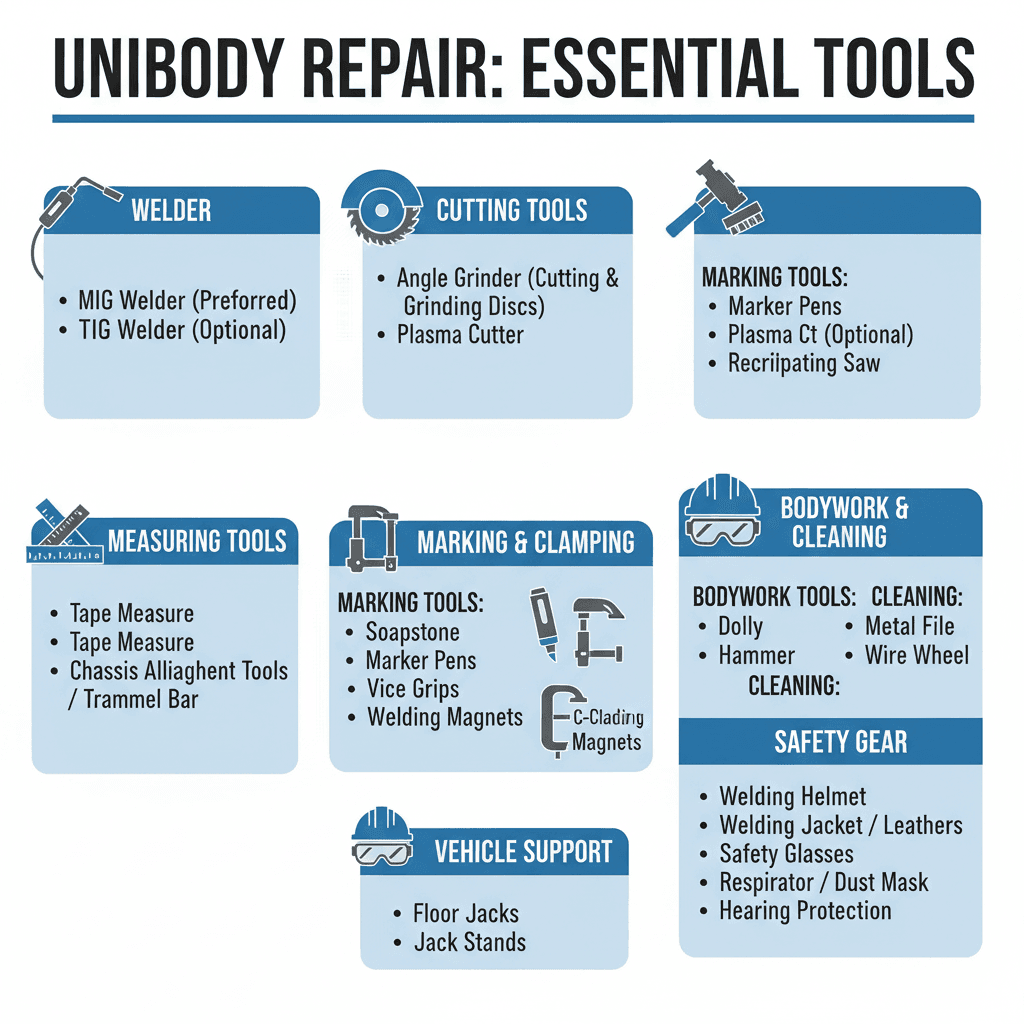
Tools and Materials You’ll Need
Gathering the right tools and materials beforehand is key to a smooth and successful back half job. Safety is paramount, so ensure you have all the necessary protective gear.
Essential Tools:
Welder: A MIG (Metal Inert Gas) welder is generally preferred for unibody work due to its versatility and ability to join thinner sheet metal cleanly. A TIG welder can also be used but requires more skill for this application.
Cutting Tools:
Angle Grinder: With cutting discs for precise cuts and grinding wheels for smoothing.
Plasma Cutter (Optional but Recommended): For faster, cleaner cuts.
Reciprocating Saw: Useful for initial rough cuts or cutting through bolts.
Measuring Tools:
Tape Measure: For general measurements.
Chassis Alignment Tools/Trammel Bar: Absolutely crucial for ensuring the new section is perfectly aligned with the front of the car. This is critical for your car’s alignment and handling.
Marking Tools: Soapstone, marker pens.
Clamping Tools: Various C-clamps, vice grips, and welding magnets to hold pieces in place during welding.
Safety Gear:
Welding Helmet: With appropriate shade for your welding amperage.
Welding Gloves: Heavy-duty leather gloves.
Welding Jacket/Leathers: To protect your skin and clothing from sparks and heat.
Safety Glasses: To wear under your welding helmet and when grinding.
Respirator/Dust Mask: For grinding and cutting fumes.
Hearing Protection: Earplugs or earmuffs.
Bodywork Tools: Dolly, hammer, metal file for minor adjustments.
Grinder/Wire Wheel: For cleaning metal surfaces before welding.
Floor Jacks and Jack Stands: Heavy-duty ones capable of safely supporting your vehicle. Ensure you have enough to lift the car securely.\
Materials:
Replacement Back Half Section: This can be a pre-fabricated kit from an aftermarket supplier or a section cut from a donor vehicle. Ensure it matches your car’s make, model, and year precisely.
Sheet Metal: If you’re fabricating parts of the section yourself, you’ll need appropriate gauge sheet steel.
Welding Wire/Gas: Appropriate consumables for your MIG welder.
Grinding Discs: For your angle grinder.
Rust Inhibitor/Primer/Paint: To protect the newly welded areas.
The Proven Method: Step-by-Step Guide
This method focuses on precision, structural integrity, and safety. It’s designed for a beginner who understands basic metalworking but needs a clear roadmap for this specific job.
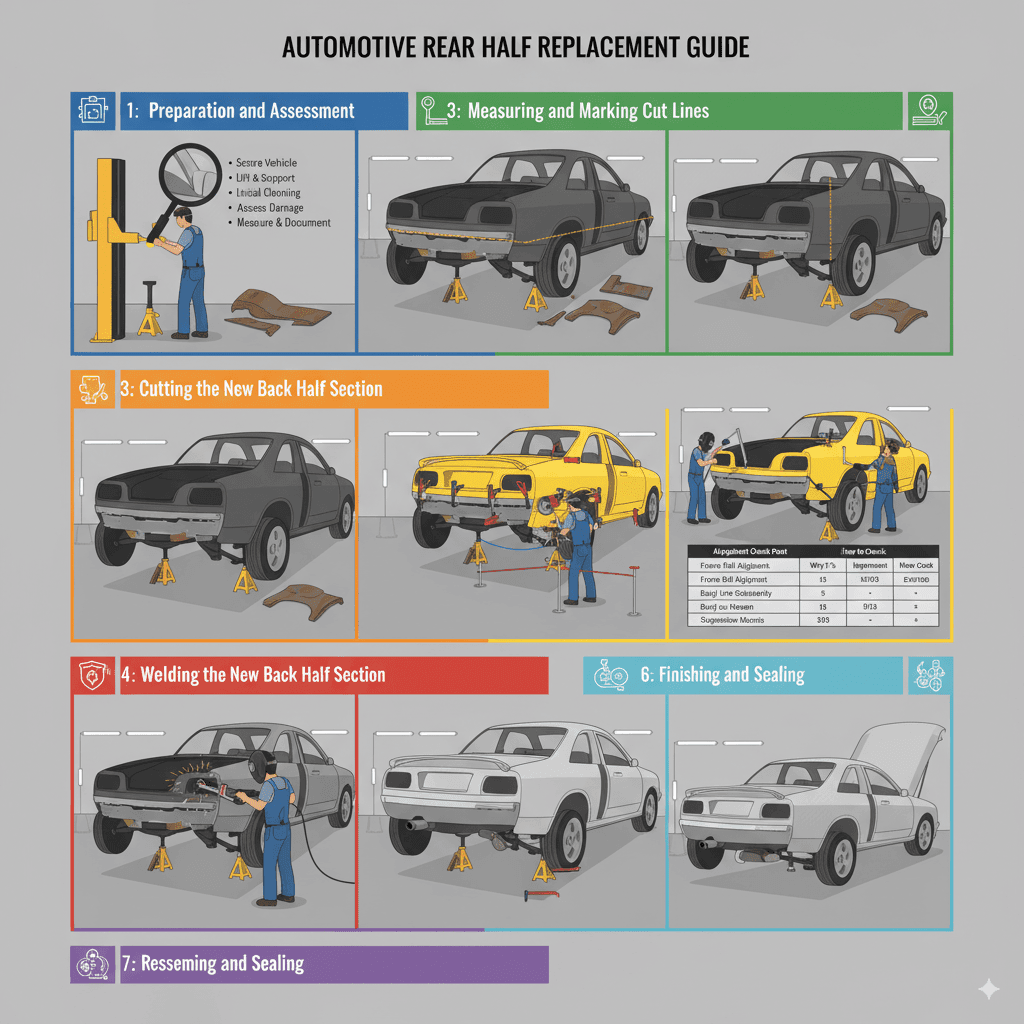
Step 1: Preparation and Assessment
Before making any cuts, thorough preparation is key.
1. Secure the Vehicle: Park the car on a level, solid surface. Use wheel chocks to prevent any rolling.
2. Lift and Support: Safely lift the rear of the vehicle using a floor jack and support it securely on robust jack stands. Ensure the car is stable and will not move during the process. The lift should be high enough to comfortably work underneath.
3. Initial Cleaning: Clean the area you’ll be working on. Remove any undercoating, dirt, or debris that might obscure rust or structural damage.
4. Assess the Damage: Carefully inspect the extent of rust or damage to the floor pan, frame rails, quarter panels, and any connecting structural components. This will help you determine the exact cut lines.
5. Measure and Document: Take detailed measurements of the existing rear structure. Photograph everything from multiple angles. If using a donor section, measure it thoroughly as well.
Step 2: Measuring and Marking Cut Lines
Precision here is non-negotiable. Incorrect cuts can lead to significant alignment issues.
1. Establish Referencing Points: Identify key structural points on the front of the car that will serve as reference. For example, the end of the existing frame rails or specific suspension mounting points.
2. Measure from Referencing Points: Using your tape measure and chalk or marker, measure from these established points to define your cut lines on the existing rear section. You want to cut just forward of the damaged area, leaving enough good metal to join the new section to.
3. Mark Precisely: Draw clear, straight cut lines. Double-check all measurements multiple times. It’s better to measure twice and cut once, as they say!
Step 3: Cutting the Old Section
This is where you’ll start removing the damaged part of your car.
1. Safety First: Put on all your safety gear: welding helmet, gloves, jacket, eye protection, hearing protection, and respirator.
2. Make the Cuts: Using your angle grinder with a cutting disc, plasma cutter, or reciprocating saw, carefully follow the marked lines to cut away the old rear section. Work slowly and deliberately.
3. Segment Removal: You might find it easier to cut the rear section into manageable pieces to remove it. If you’re using a cutting wheel, avoid cutting into good, structural metal that you intend to join the new section to.
4. Clean Edges: Once the old section is removed, use your angle grinder with a grinding disc or wire wheel to clean the cut edges of the remaining structure. This ensures a good surface for welding the new section.
Step 4: Fitting the New Back Half Section
This step is about ensuring the new section aligns perfectly before you make it permanent.
1. Position the New Section: Carefully position the replacement back half section onto the remaining structure.
2. Align Referencing Points: Crucially, use your measuring tools (especially trammel bars or alignment tools) to ensure the new section is aligned with the front of the car. Measure from the same reference points you used earlier. The frame rails of the new section must be perfectly parallel and aligned with the front frame rails. This is critical for proper wheel alignment and handling. Refer to a factory service manual or a reputable automotive repair resource for precise alignment specifications. For unibody cars, ensuring the body lines and panel gaps flow correctly is also vital.
3. Temporary Clamping: Once aligned, use numerous clamps and welding magnets to hold the new section securely in place. Ensure there are no gaps between the joining surfaces. Check alignment again after clamping.
| Alignment Check Point | Why It’s Important | How to Check |
|---|---|---|
| Frame Rail Alignment | Ensures proper wheel alignment, steering, and tire wear. | Use trammel bars or a measuring tape to take diagonal measurements between key points on the front and rear frame structure. They should be equal. |
| Body Line Continuity | Ensures the car looks symmetrical and the panels will fit correctly. | Visually inspect the body lines. Use tape measure to check distances from a central point (e.g., centerline of the car) to specific body features on both sides. |
| Suspension Mounts | Ensures suspension components mount correctly and the car sits level. | Verify that suspension mounting points on the new section align perfectly with where they should connect to the vehicle’s components or chassis. |
Step 5: Welding the New Section
This is the most critical structural step. Proper welding provides the strength and integrity your car needs.
1. Prepare for Welding: Ensure the joining surfaces are clean, free from rust, paint, and oil. A clean surface is essential for strong welds.
2. Tack Welds: Start by applying short “tack” welds around the perimeter of the new section to hold it firmly in place. Space these tack welds about 4-6 inches apart.
3. Check Alignment (Again!): After tack welding, re-check all your alignment measurements. If anything has shifted, you’ll need to carefully adjust it before proceeding.
4. Continuous Welding: Once you are confident in the alignment, begin to lay down continuous welds along the seams where the new section joins the old. Weld in short sections (1-2 inches) and allow them to cool slightly to minimize heat distortion. Alternate sides and locations to distribute heat.
5. Weld Penetration: Ensure good penetration. For unibody construction, this means the weld should fuse both pieces of metal together strongly. Practice on scrap pieces of metal if you are unsure about your welding technique. Consult resources like the American Welding Society (AWS) for welding best practices.
6. Reinforce (If Necessary): Depending on the design of the car and the replacement section, you may need to add gussets or reinforcing plates to critical structural areas, especially along frame rail seams.
Step 6: Finishing and Sealing
Once the structural welding is complete, you’ll want to protect your work.
1. Grind Welds: Carefully grind down any excess weld material that protrudes or obstructs panel fitment. Be careful not to grind too deep into the weld.
2. Clean and Inspect: Thoroughly clean the entire welded area. Inspect all welds for any signs of porosity (small holes) or weakness. Re-weld any areas that look suspect.
3. Apply Rust Inhibitor: Apply a good quality rust inhibitor or epoxy primer to all exposed metal, especially on the inside of the frame rails and any areas that will be difficult to access later. This is vital for long-term protection.
4. Seal Seams: Use seam sealer to seal the welded joints on the exterior and interior surfaces where water could potentially enter and cause future rust.
5. Primer and Paint: Once the rust inhibitor and seam sealer are dry, apply a suitable primer and then your chosen paint color to match the rest of your vehicle.
Step 7: Reassembly
Now it’s time to put things back together.
1. Reinstall Components: Reinstall any suspension components, fuel lines, brake lines, wiring harnesses, fuel tank, exhaust system, and body panels that were removed or disconnected.
2. Lower the Vehicle: Carefully lower the vehicle off the jack stands.
3. Final Checks: Check all mechanical and electrical connections. Ensure the exhaust system is properly routed and not touching anything it shouldn’t.
Pros and Cons of Back Halfing a Unibody Car
Like any major repair, back halfing has its advantages and disadvantages. Weighing these will help you make an informed decision.
Pros:
Restores Structural Integrity: This is the primary benefit – bringing back the strength and safety of the car’s rear structure.
Extends Vehicle Life: Repairing rust or damage can prevent further deterioration and significantly extend how long you can use your vehicle.
Cost-Effective (Potentially): For vehicles that are otherwise sound, back halfing can be cheaper than replacing the entire vehicle.
Maintains Originality: For classic cars, proper back halfing preserves the original chassis.
Cons:
Labor Intensive: It’s a time-consuming and physically demanding job.
Requires Specialized Skills: Welding and metal fabrication skills are essential.
High Cost of Tools/Parts: If you don’t already own the necessary tools, their purchase can be significant. Replacement parts can also be expensive.
Risk of Misalignment: Improper alignment during the process can lead to serious driving problems.
Can Be Difficult to Find Parts: For some older or rarer models, finding an exact replacement back half section can be challenging.
Frequently Asked Questions (FAQ)
Here are some common questions beginners have about back halfing a unibody car.
Q1: Can I back half a car without welding?
A1: No, welding is absolutely essential for structurally sound back halfing of a unibody car. Bolting or using adhesives alone will not provide the necessary strength and integrity to restore the vehicle’s chassis.
Q2: How do I find the right replacement back half for my car?
A2: You can purchase new, pre-fabricated back half sections from aftermarket auto parts suppliers specializing in body repair. Alternatively, you can find used sections by salvaging them from a compatible vehicle at a junkyard or from online used car parts marketplaces. Always ensure it’s for your exact make, model, and year.
Q3: What’s the difference between back halfing a unibody car and a body-on-frame car?
A3: A unibody car has a single structure where the body and frame are integrated. Back halfing involves cutting and welding this integrated structure. A body-on-frame car has a separate chassis (frame) onto which the body is mounted; back halfing a body-on-frame car typically refers to replacing sections of the separate frame.
Q4: Can I just patch the rusted areas instead of back halfing?
A4: For minor rust, patching might be an option. However, if the rust is extensive, has compromised structural integrity (like frame rails), or is in multiple areas of the rear section, back halfing is the safer and more effective long-term solution. Patching severely rusted areas can be a temporary fix that leads to bigger problems later.
Q5: How important is it to get the alignment perfect?
A5: It is critically important. Even a slight misalignment after back halfing can lead to poor handling, excessive tire wear, and steering problems. Using specialty alignment tools like trammel bars is crucial to ensure the new rear section matches the original factory specifications.
Q6: What kind of welder is best for this job?
A6: A MIG (Metal Inert Gas) welder is generally recommended for back halfing unibody cars. It’s versatile, relatively easy to learn, and excellent for joining the thinner gauge metal typically found in unibody structures.
Q7: What if my car’s value is low? Is back halfing still worth it?
* A7: The decision often depends on your attachment to the car, the cost of parts and your labor, or if it’s a classic or special model. For many everyday cars, the cost of back halfing might exceed the car’s market value. However, if you plan to keep the car for a long time or enjoy the DIY process, it can be a rewarding project.
Conclusion
Back halfing a unibody car is undeniably a challenging
Hi, I’m Melvin, an automobile engineer with extensive experience in automobile equipment. I currently work for a local automobile firm, where I specialize in the car parts industry. I’ve had the opportunity to collaborate with seasoned inspectors, gaining invaluable hands-on experience that goes beyond just theory.
My passion for automotive care started at a young age, which led me to create CarSpareCare. Through CarSpareCare, I share the knowledge and skills I’ve acquired over the years to help others navigate the world of car maintenance and repairs.
My goal is to provide practical tutorials, essential safety advice, and the latest industry insights so that anyone—whether a beginner or an expert—can confidently tackle their automotive projects.

