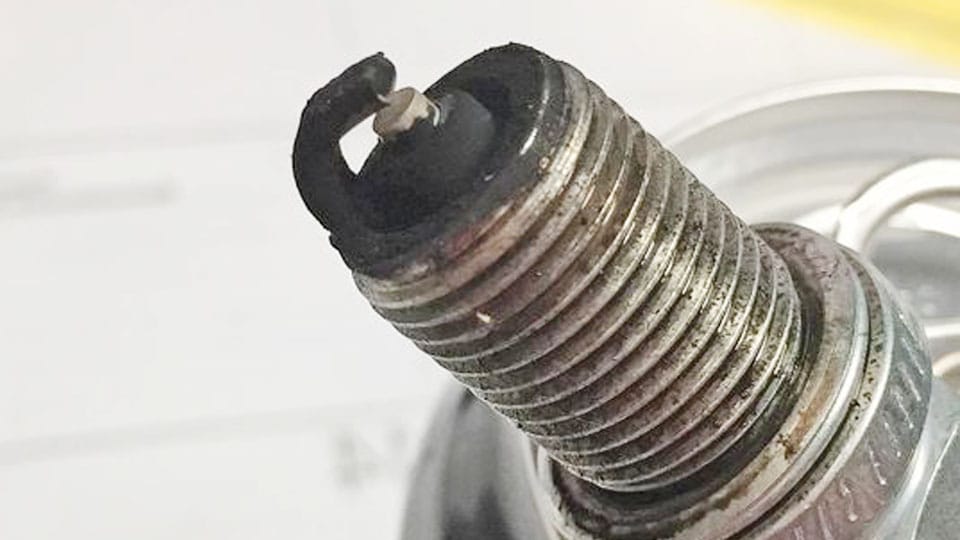
Clean spark plug threads with compressed air and a soft nylon brush first. If the threads are dirty but intact, use the correct spark plug thread chaser by hand. Stop if the threads are crossed, stripped, or loose. Bad cleaning can crack the plug, distort the aluminum head, or let the plug seize and strip on installation. This guide shows when to clean, when to chase, and when the cylinder head needs repair before the plug goes in.
Why thread cleaning matters


Spark plug threads do more than hold the plug in place. They control clamp load, heat transfer, and how smoothly the plug starts in the cylinder head. Dirt, rust, carbon, and damaged lead-in threads raise the chance of cross-threading and can leave the plug tight before it ever reaches torque.
Aluminum heads need extra care. The soft threads in the head can gall, pull, or seize if debris stays in the hole or if the plug starts crooked.
One repair source cited by wikiHow says to clean one spark plug at a time and to use compressed air before removing the plug, with eye protection when using canned air. (Wikihow)
What dirt and carbon do
Loose grit can fall into the cylinder and score the chamber or piston. Carbon on the plug threads can make the plug feel tight early, which tempts someone to force it. If the plug does not turn smoothly by hand for several turns, stop and inspect the start of the threads.
Why aluminum heads need extra care
Aluminum threads are easier to damage than cast iron threads. A damaged start thread or a crossed first turn can turn into a head repair job fast. That is why cleaning the hole is about inspection as much as debris removal.
What you’ll need
- Correct spark plug socket
- Ratchet and extension, if needed
- Compressed air or canned air
- Eye protection
- Soft nylon brush
- Correct spark plug thread chaser or thread cleaner
- Torque wrench
- Clean rag
- Manufacturer-approved spark plugs
- Use anti-seize only if the plug maker or vehicle manual allows it.
wikiHow advises cleaning one spark plug at a time and using compressed air before removing the plug. That helps keep debris from migrating into the cylinder when the plug comes out.
Can you clean these threads safely?
Start with a quick judgment before you put a tool in the hole. Dry dirt and loose carbon are usually cleanable. Light corrosion may respond to the correct chaser. Crossed starts, pulled aluminum threads, or a thread that will not hold a plug straight are stop points, not cleaning jobs.
| Symptom | Safe action | Required tool | Stop/repair threshold |
|---|---|---|---|
| Dry dirt | Blow out the plug well and hole; brush loose dust from the exposed plug threads. | Compressed air, soft nylon brush, eye protection | Stop if debris keeps falling from the hole or the plug will not start by hand. |
| Carboned threads | Clean loose carbon with a nylon brush; use a light hand-start check only. | Nylon brush, spark plug socket | Stop if the plug tightens before several full turns or the first thread looks distorted. |
| Light corrosion | Use the correct thread chaser by hand with light lubrication if the maker allows it. | Matched thread chaser, hand tool | Stop if the chaser binds hard, skates, or removes thread material. |
| Crossed start | Remove the plug, inspect the first threads, and do not force a reinstall. | Inspection light, plug socket | Repair the head if the plug will not start straight after careful realignment. |
| Pulled aluminum threads | Do not install the plug; the hole needs thread repair. | Thread repair kit or professional repair tools | Immediate stop if the plug can rock, wobble, or turn without taking torque. |
| Reuse after thread repair | Verify the repair insert is seated correctly, then install to spec with a torque wrench. | Torque wrench, correct plug, repair insert as fitted | Stop if the repaired hole feels rough, loose, or out of alignment. |
Clear the plug well. Blow loose dirt away from the spark plug hole before removal, then inspect the area with a light. Use eye protection when using compressed or canned air, and be careful not to blast debris down into the cylinder.
Remove one plug. Use the spark plug socket on one plug at a time. That keeps the other cylinders closed off and makes it easier to compare the removed plug with the hole it came from.
Inspect the hole. Look at the first few lead-in threads, not just the depth of the hole. A clean hole should show intact thread peaks, no shiny pulled sections, and no debris sitting on the seat.
Brush the exposed threads. Clean the removed plug threads with a soft nylon brush only. Do not use sandpaper or a file; abrasive cleaning can damage the coating and change how the plug installs.
Chase only if needed. If the hole has light corrosion or packed residue but the threads still look sound, use the correct spark plug thread chaser by hand. Match the thread size exactly to the plug, turn it slowly by hand, and wipe away loosened debris so it does not fall into the cylinder. Use light lubrication only if the plug or tool maker allows it.
Test the hand start. Thread the plug in by hand first. Use the socket only as a holder. It should turn several full rotations easily by hand; if it catches early, back it out and inspect again instead of forcing it.
Torque to spec. Finish with a torque wrench at the manufacturer specification. This matters most on aluminum cylinder heads, where overtightening can strip the threads and undertightening can let the plug work loose.
When should you use a thread chaser?
Use a thread chaser when the plug hole is dirty or lightly corroded but the original thread form is still present. A chaser cleans and restores the existing threads; it is not meant to cut a brand-new thread path or fix a badly damaged hole. If the plug will not start straight, do not force the chaser to create one.
Using a chaser on the removed plug
If the removed plug itself has carbon or light rust on the threads, clean it gently with a nylon brush first. The plug should still thread smoothly by hand afterward. A chaser on the plug is a cleanup aid, not a rescue tool for bent or damaged threads.
Using a chaser in the spark plug hole
Choose a chaser that matches the spark plug thread size. Turn it by hand so it follows the existing thread line, then back it out and wipe away loosened debris before it can drop into the cylinder. If the tool binds hard or cuts aggressively, stop; that usually means the hole needs repair, not more force.
When cleaning stops and repair begins
Stop cleaning when the plug starts crossed, the aluminum threads pull, or the plug feels loose in the first few turns. At that point, the correct fix is thread repair, such as a properly installed insert, or a professional repair if the damage is severe. Do not install the plug into a hole that cannot hold a straight hand start.
Common mistakes
- Using abrasive paper or a file on the plug threads. That can damage the coating and change how the plug seats.
- Blowing debris into the cylinder instead of out of the hole. Keep the air aimed so loose material exits the plug well.
- Confusing a chaser with a tap that cuts new threads. A chaser should follow the original thread form, not remake it.
- Skipping the hand-start check. If the plug will not thread in by fingers for several turns, something is wrong.
- Using anti-seize automatically. Some plated spark plugs and some OEM procedures discourage it, and any added compound can change torque behavior.
- Overtightening the plug because it “felt clean.” Use a torque wrench, especially on aluminum heads.
Say your plug starts smoothly by hand for three or four turns, but the wrench feels tight well before spec. That often points to dirt left in the threads or anti-seize changing friction, not a healthy install. Back it out, inspect the lead-in threads, and start over before the plug galls the head.
Suppose the hole has a light white crust from corrosion, but the first threads still look intact. A matched chaser may clean it up. If the chaser skips, cuts hard, or leaves shiny missing metal, stop and move to repair instead of installing the plug.
How do you prevent spark plugs from seizing in the head?
Prevent seizure by keeping the hole clean, installing the plug by hand first, and torquing it to specification. Use anti-seize only if the plug maker or vehicle manual calls for it; some plated plugs are designed to run dry. If anti-seize is allowed, follow the plug maker or vehicle manual for the correct torque procedure.
Recheck plug condition during service intervals. A plug that is removed on time and reinstalled cleanly is far less likely to gall than one that is left in place until corrosion builds up around the threads.
How do you fix stripped spark plug threads?
Light thread wear may be recoverable with the correct chaser, but stripped threads are a repair job. In an aluminum head, a proper threaded insert installed to the correct depth is the usual fix, or replacement of the head if the damage is too severe. Do not put a spark plug back into threads that cannot hold torque.
How do you repair spark plug threads in an aluminum head?
Repair in aluminum usually means removing the damaged material and installing a matched insert system designed for spark plugs. The repair must keep the plug aligned with the chamber and seal correctly. If the hole is cracked, badly ovaled, or missing too much material, a professional machine-shop repair is the safer choice.
How do you remove broken spark plug threads?
Broken thread pieces should be removed only with the correct extraction or repair method for the specific damage. If parts of the old thread are loose in the hole, avoid spinning them deeper into the head. Severe breakage, especially in an aluminum cylinder head, is a strong reason to stop and have the repair handled with proper tooling.
Frequently asked questions
How do you clean spark plug threads before installation?
Clear the hole, inspect the lead-in threads, and clean the removed plug with a soft nylon brush. If the threads are intact but dirty, use the correct chaser by hand and keep loosened debris out of the cylinder. Then hand-start the plug and torque it to spec.
What should you use on spark plug threads?
Use a soft nylon brush, compressed air, and, if the hole needs it, the correct spark plug thread chaser. Anti-seize is optional and sometimes discouraged depending on plug plating and OEM guidance. If it is allowed, use only the amount the plug or vehicle maker specifies.
Do spark plug threads need anti-seize before installation?
Not always. Some spark plugs are plated and meant to go in dry, and some vehicle makers do not want anti-seize used at all. If the manual allows it, use only a thin, controlled amount and follow the maker’s instructions.

Hi, I’m Melvin, an automobile engineer with extensive experience in automobile equipment. I currently work for a local automobile firm, where I specialize in the car parts industry. I’ve had the opportunity to collaborate with seasoned inspectors, gaining invaluable hands-on experience that goes beyond just theory.
My passion for automotive care started at a young age, which led me to create CarSpareCare. Through CarSpareCare, I share the knowledge and skills I’ve acquired over the years to help others navigate the world of car maintenance and repairs.
My goal is to provide practical tutorials, essential safety advice, and the latest industry insights so that anyone—whether a beginner or an expert—can confidently tackle their automotive projects.