
Use a light polish and foam applicator for faint swirls, a dual-action polisher with a finishing pad for moderate ones, and reserve wet sanding or body-shop repair for deep scratches. Use the wrong level of cut, and you can haze the clear coat or cut through it. This guide shows how to judge swirl severity, choose the right correction method, match pad and polish to the damage, and seal the finish after correction.
This guide is part of our Automotive paint care guide series.
How bad are the swirl marks?

Start by confirming whether the defect is a true swirl, a haze, or a deeper scratch. Swirl marks are usually in the clear coat and show most clearly in direct sun or a strong inspection light. If the mark changes with lighting but does not catch a fingernail, it is often correctable by polishing rather than repair.
How do you diagnose swirl severity?
Use a simple severity check before you polish. Inspect the panel in sunlight or with an LED, feel the mark with a clean fingernail, and compare hazy finish to holograms or straight scratches. If the defect catches a nail, reaches past the clear coat, or sits on a damaged edge, stop and reassess.
What you’ll need
- pH-balanced car shampoo
- Two buckets, plus a grit guard if available
- Clean microfiber wash mitt
- Clean, dedicated microfiber towels for drying and residue removal
- Clay bar and clay lubricant
- Polishing compound in cutting or finishing strength
- Foam applicator pad for hand work
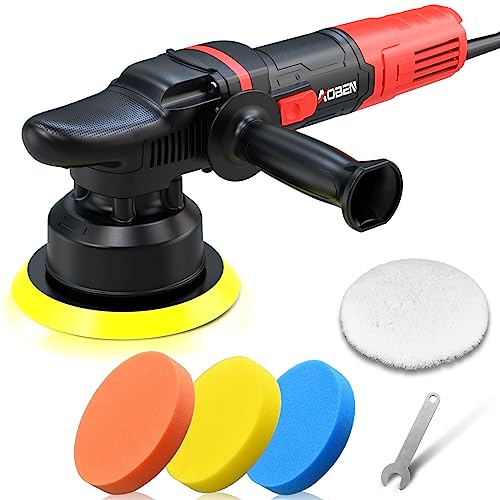
- Dual-action polisher for moderate correction
- Foam or microfiber polishing pads in finishing and light-cut levels
- Paint sealant, wax, or coating for aftercare
- Good inspection light or sunlight
Begin with the mildest method that can still level the defect. Wash with the two-bucket method, decontaminate with clay if the surface feels rough, then polish only as much as needed to remove the swirls. The clear coat is the layer you are leveling, so the goal is correction with minimal removal.
How do you remove swirl marks step by step?
Work from least aggressive to most aggressive. Wash, decontaminate, inspect, test a small section, then polish only until the marks improve under the same light you used for diagnosis. If the first combination does not help, step up one level rather than jumping straight to a heavy compound or wet sanding.
- Wash the panel first. Use the two-bucket wash method: one bucket for shampoo solution and one for rinse water. A grit guard helps keep dirt at the bottom so you do not drag it back onto the paint.
- Decontaminate the paint. If the surface feels gritty, use a clay bar with clay lubricant before polishing. This helps keep embedded contamination from being rubbed across the clear coat.
- Inspect under strong light. Check the paint in direct sun or bright shop lighting. Mark the worst panels so you do not overcorrect areas that only need finishing polish.
- Test the least aggressive combo. Begin with a finishing polish and a soft foam pad on a small test section, about 2 ft by 2 ft. If the swirls remain, move up to a light-cut compound and a firmer pad.
- Work the polish slowly. Move the pad in overlapping passes until the product turns clear or thin, then wipe with a clean microfiber towel. Keep the towel clean and dedicated to paint care; do not use one that touched the ground.
- Check the finish again. Reinspect the same area under the same light. If the swirls are reduced but still visible, repeat once with the next mildest increase in pad or product strength before stopping.
- Protect the corrected paint. Finish with wax, sealant, or a coating after the correction is done. Protection does not remove swirls, but it helps preserve the corrected finish and makes future washing safer.
Swirl marks decision table
| Swirl severity | Recommended DIY method | Tool level | Likely product type | Estimated time | Risk level | Stop and refer to a pro when |
|---|---|---|---|---|---|---|
| Light swirls | Hand polish or DA polisher with a finishing pad | Low | Finishing polish | 1 to 2 hours for a few panels | Low | One or two passes do not change the marks, or the paint starts to haze |
| Moderate swirls | Dual-action polisher with a light-cut pad, then refine with a finishing pad | Medium | Polishing compound, then finishing polish | 3 to 6 hours for the car | Medium | You see DA haze, the finish looks cloudy, or the swirls are still obvious after a sensible test spot |
| Severe swirls | Professional correction or carefully controlled wet sanding only if paint thickness supports it | High | Cutting compound, possible wet sanding | 2 to 3 days | High | Edges look thin, the marks do not improve, or you are seeing through the clear coat |
| Mixed swirls/scratches | Split approach: polish the swirls, leave deeper scratches for repair assessment | Medium to high | Compound plus inspection polish | Half a day to 2 days | Medium to high | Any scratch catches a fingernail, or the defect remains after the first correction pass |
Detailing services often use a similar ladder. Detail 2 U lists single-stage correction at 30% to 50% defect removal and two-stage correction at 75% to 90% defect removal. It also notes a foam bath pre-soak, clay bar decontamination, paint iron remover exfoliation, digital paint inspection, and a final polish on its two-stage service. For cost context, Detail 2 U also lists an hourly paint correction option at $125 per hour and hourly wet sanding or severe defect removal at $175 per hour.
When should you stop correction?
Stop if the scratch catches a fingernail, the edge of a panel looks thin, or the finish starts to haze before the defect improves. A clear-coat polish should improve clarity, not replace one problem with another. If the mark is still obvious after a sensible test spot, professional assessment is the safer next step.
Can you remove swirl marks by hand?
Yes, but only for light swirls and only on panels with modest defect levels. A hand-applied finishing polish can reduce faint clear-coat marring, while a DA polisher is the better choice once the marks are visible from a normal standing distance. If the damage is moderate, hand work usually stalls before the finish is clean enough.
What hand method works best?
Use a foam applicator, a finishing polish, and a small test spot. Apply moderate pressure, work the product until it thins, then wipe and inspect under bright light. If the marks barely change, do not lean harder into the panel; step up to a dual-action polisher instead.
- Use a test spot. Apply a finishing polish to a 12-inch square with a foam applicator, then wipe and inspect. If the swirls fade, continue panel by panel.
- Step up carefully. If the test spot barely changes, switch to a dual-action polisher with a light-cut pad and repeat the same section. Increase aggressiveness only one level at a time so you do not chase defects into haze.
- Stop at improvement. If the marks improve but do not fully disappear, protect the finish and leave the remaining defects alone. That is better than thinning the clear coat to chase perfection.
Say your hood shows faint spider-web lines only under a bright LED. A finishing polish by hand may clean that up. Suppose the same hood still shows the lines after two short passes; move to a DA polisher rather than pressing harder by hand.
How do you remove swirl marks on black paint?
Black paint needs stricter inspection and a gentler finish step because swirls, haze, and holograms show more easily. Use the same correction path, but verify under strong light after every step and finish with the softest pad that can still leave the surface clear. Dark paint often looks “done” in shade before it is actually refined.
On dark finishes, the last inspection matters as much as the correction itself. A panel can look clean in the garage and still show machine marks outdoors. Keep the process conservative, and use the lightest pad and polish combination that gives a clear result.
How do you keep black paint from showing haze?
Use a softer finishing pad, lighter product load, and slower final passes so the clear coat levels evenly. If the finish looks cloudy after a stronger step, refine it before you stop. On black paint, the last pass is usually about refining clarity, not increasing cut.
If that didn’t work
- Refine the test spot. Swap to a softer foam pad and a finishing polish, then rework the same area with slower passes. This often clears DA haze that a firmer pad left behind.
- Reduce product strength. If the section looks cloudy, step down from a cutting compound to a finishing polish. On black paint, less aggressive is often the better last step.
- Stop and inspect edges. If the swirls remain after one sensible correction cycle, or the edge of a panel looks thin, stop polishing. Burned edges and deeper scratches need professional evaluation.
A common first-timer mistake is treating black paint like every other color. The correction method is the same, but the stopping point is not. On black, the inspection light is part of the process, not an optional extra.
Common mistakes
Most bad results come from using too much cut too soon, skipping decontamination, or polishing over dirt. Another common problem is overworking one spot until the clear coat heats up and hazes. If the towel is dirty, dropped, or contaminated, replace it before it touches paint again.
What are the biggest swirl-removal mistakes?
The most common errors are rushing to a heavy compound, failing to wash and clay first, and using the same towel for dirty and clean work. Another mistake is chasing deeper scratches as if they were swirls. That can waste time and create more visible damage in the clear coat.
- Skipping the wash and claying stage, then grinding grit into the clear coat.
- Starting with a heavy compound when a finishing polish would have been enough.
- Using a contaminated microfiber towel for final wipe-downs.
- Chasing deep scratches that catch a fingernail as if they were swirls.
- Polishing until the panel looks glossy in shade, then stopping without checking under bright light.
- Ignoring soft-paint holograms or DA haze after correction.
How much does it cost to remove swirl marks from car paint? A DIY setup can stay relatively low if you already have wash supplies, towels, and a basic polish. Professional correction varies by defect level; Detail 2 U lists another hourly paint correction option at $125 per hour, hourly wet sanding or severe defect removal at $175 per hour, and notes that wet sanding or hourly paint correction can take 2 to 3 days.
If that did not work, the next step is not more pressure. It is a more controlled correction cycle, or a pro if the damage is beyond the clear coat or still visible after a reasonable test spot.
How much does swirl removal cost?
DIY costs depend on what you already own, while professional pricing usually rises with defect depth and time. Heavier work can take 2 to 3 days, especially when the finish needs multiple stages.
Frequently asked questions
How much does it cost to remove swirl marks from car?
DIY costs depend on what you already own, but a full professional correction is usually priced by severity and time. Heavier work can take 2 to 3 days.
Can you get swirl marks out of car paint?
Yes, if the marks are in the clear coat and not too deep. Light and moderate swirls are often correctable with polishing, while deeper scratches, burned edges, soft-paint holograms, or swirls that remain after a sensible attempt call for professional help. Do not keep polishing just to force a result.
What is the best way to remove swirl marks from car paint?
The best method is the least aggressive one that fully corrects the defect. For faint swirls, use a finishing polish by hand. For moderate swirls, use a dual-action polisher with a finishing or light-cut pad. Follow with protection so the corrected clear coat stays easier to maintain.
What aftercare should you use?
After correction, pair the finish with wax, sealant, or a coating to help preserve the result. Protection does not remove defects, but it reduces the chance of fresh marring during washing and drying. The best follow-up is gentle maintenance rather than another aggressive polish cycle.

Hi, I’m Melvin, an automobile engineer with extensive experience in automobile equipment. I currently work for a local automobile firm, where I specialize in the car parts industry. I’ve had the opportunity to collaborate with seasoned inspectors, gaining invaluable hands-on experience that goes beyond just theory.
My passion for automotive care started at a young age, which led me to create CarSpareCare. Through CarSpareCare, I share the knowledge and skills I’ve acquired over the years to help others navigate the world of car maintenance and repairs.
My goal is to provide practical tutorials, essential safety advice, and the latest industry insights so that anyone—whether a beginner or an expert—can confidently tackle their automotive projects.

